
Module 4: Using Model Builder - PowerPoint PPT Presentation
1 / 24
Title:
Module 4: Using Model Builder
Description:
Project elements (blue ovals) exist prior to model. Tool to be executed ... Diagram Shape Symbology. Single Input Model: Area Within 100 meters of Streams? ... – PowerPoint PPT presentation
Number of Views:113
Avg rating:3.0/5.0
Title: Module 4: Using Model Builder
1
Module 4 Using Model Builder
2
Why Build Geoprocessing Models?
- Sequence of geoprocessing tools
- Flowchart story of geoprocessing operations
- Allows parameters for flexible models
- Allows for sharing of models among users
3
(No Transcript)
4
(No Transcript)
5
Model Builder Toolbar
6
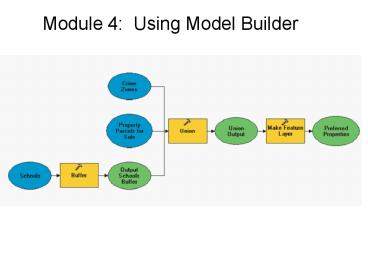
- Project elements (blue ovals) exist prior to
model - Tool to be executed (yellow rectangle)
- Derived data (green ovals) produced by tool
- Connector (arrow) showing sequence of processing
- Value (light blue oval)
- Derived value (light green oval)
7
Two Choices For Diagram Shape Symbology
8
Single Input ModelArea Within 100 meters of
Streams?
9
Multiple Input ModelParcels Within Flood Zone
10
Multiple Outputs
11
Parcels that are
- On The Market
- Near A School
- In Low Crime Area
12
Create A New Model
13
Drag Tool Into Model Builder Window
14
Open Tool And Specify Input/Output/Query
Expression
15
Validate, Then Run The Simple Model
16
Connect Output To Next Process
17
Specify Output Name
18
Rename Output Elements
19
(No Transcript)
20
(No Transcript)
21
Display Model Output
22
Name and Label Model
23
Model Parameters Flexibility
24
(No Transcript)
Recommended
CrystalGraphics Presentations


