
Closet Shelving Layout and Design PowerPoint PPT Presentation
Title: Closet Shelving Layout and Design
1
Closet Shelving Layout and Design
2
- When I started out in the building business,
interest rates were low, money was - easy to borrow, and custom homes were the way to
go. But six years later, in the - early 1980s, that all changed. Interest rates
went over 15. No one could - afford, let alone qualify, for a loan. Economics
and demand dragged us into - multi-family housingwe started installing
finish work on apartment - complexes, condominiums, and townhouses. The work
was hard, the prices - competitive, but the profits were good if you had
your act together, if you were - fast and didnt make mistakes.
- Five or six years later, I was glad when the
custom home business came back - with a roar. But I wouldnt trade what I learned
from those 200-plus unit - buildings, not a bit of it. Our approach to every
high-end custom jobfrom the - big ones to the little ones, and our profit
marginsstill depends on the lessons - learned from production work. And installing
shelving is a perfect example.
3
- When it comes to installing closet shelving, if
your crew isnt following a manual - of practicea system that simplifies repetitive
tasks, eliminates needless steps, and - speeds installation timethen youll never enjoy
the profits that can be made in - closets. Once the exterior doors are in, before
installing any interior doors or trim, - we like to get the closet shelving in place, if
its paint grade. Its just easier to work - in a closet without the doors in the way, and
besides, that way we dont have to - worry about banging shelving into new doors. We
wait to install the baseboard until - all the shelving is in, too, because the
baseboard has to be cut around the dividers.
4
- Closet Design
- Laying out and installing closet shelving used to
be simpleyou just installed a - single shelf and pole in every closet, about 66
in. from the floor, so a dress - wouldnt drag on the carpet. Maybe people didnt
have so many clothes - back then.
- Today, closet design is an important part of
construction, but designing closet - shelving doesnt have to be a brain-twister.
Though closets seem to come in many - different sizes and shapes, theyre actually
limited to only two basic types walk-in - closets, and reach-in closets.
5
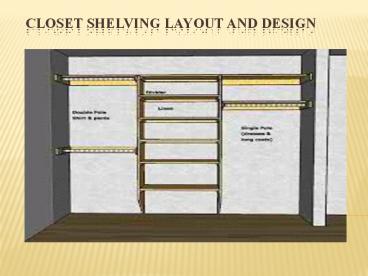
- Control Closet Design
- No matter how high-end a home, the closets always
share a lot in commonat - least the ones outside the master bedroom. After
all, there are only so many - possible configurations. The three most common
types of shelving arrangements - are Double Pole, Single Pole, and Linen Shelves.
We try to include a little of each - in every closet, and we use 15 1/2 in. dividers
to separate and help support - the shelving.
- To allow enough room for medium-length coats and
shirttails, Double Pole should - be spaced a minimum of 40 in. from the floor, and
40 in. apart. That puts the top of - the 14 cleats at 42 in. and 84 in. from the
floor (see image, below). We angle-cut - our dividers, leaving a 1-in. toe on the floor,
so its easier to get a vacuum near the - wall. Whether the customer wants wood, melamine,
or MDF shelving, we limit the - spananything over 34 in. will sag without a
support.
6
- Single Pole is meant for dresses and long coats.
It must be installed at least 66 in. - from the floor, farther for tall clients. To
secure the pole and the rosettes, we use - 14 cleats to support all closet poles. For linen
shelving, we use 12 cleats. - This shelving arrangement is a catchallits not
meant just for bedding shirts, - sweaters, sports clothing, and even toys will end
up on these shelves. To keep - closets uniform and easier to install, we keep to
the same layout12 in. on center - for all but the bottom two shelves.
- Blankets and boxes need more space, so we put the
first linen shelf at 18 in. from - the floor, and the second one 15 in. higher, for
boots or tall toys. - The top shelf is usually above the door header,
which means that, in a 24-in. deep - closet, its tough to get anything up there.
7
- Even though the dividers are 15 1/2 in. deep (so
theyll support the poles!), we install a - 12 in. top shelf, and radius or angle-cut the
tops of the dividers. - These simple design rules apply to even the most
complicated closets, from reach-ins, - like the one in the previous illustrations, to
elaborate walk-ins, like the one below. Just - remember one thing whenever you turn a corner
with shelving All closet poles require a - minimum 24 in. clearance before the next divider,
otherwise there wont be enough - room to slide clothes into the corner.
- Walk-in closets, and long reach-ins, pose a
problem when it comes to shelves sagging, - too. The best solution is another design
strategy eliminate mid-span supports on linen - shelves by limiting their span to 32 in., and
then let the closet poles run longer. After all, - metal supports for single and double pole are
easy to install, but installing supports for - linen shelving isnt so easy, and there are a lot
more shelves!
8
- A Not-so-simple story pole
- Obviously, the trick to making money in closet
organizers is being organized - yourself, and that starts with the design. Once
youve controlled and simplified the - design, control and simplify the layout and
installation, tooteach your crew how - to make and use a story pole for every job.
- Its a fact of life the more times your
carpenters pull out a tape measure, the more - mistakes theyll make, the slower theyll work,
and the less profit theyll produce. - Theres hardly a carpentry layout task that
doesnt benefit from the use of a story - pole.
- Make closet story poles from a piece of durable
14, and dont just pencil the marks - cut notches so the pole can be used from job to
job.
9
- Make all the notches at the top of the support
cleats, except the top cleat! Instead, - cut the story pole 3 1/2 in. short, so the mark
for the top shelfmade by striking a - pencil across the top of the story polewill be
at the bottom of the cleat that way, - your carpenter wont have to climb a ladder to
see the top shelf mark. - With good design control and a story pole, a
single carpenter can lay out all the - closets in a typical home in less than one hour,
and even make a cut list, too. - Whenever possible, we try to keep linen shelves
the same width, so they can be cut - in packages. The same with Double Pole
arrangements, especially if there are - several closets of roughly the same size. That
way, only one special measurement - needs to be made in each closet. But Ill save
that subject for another day.
10
- Important Closet Requirements
- Single Shelf-and-Pole To accommodate long coats
and dresses, a section of Single Shelf- - and-Pole should be installed in every closet
(closets for children are often an exception). To
- keep dresses and coats from dragging on the
floor, install Single Shelf-and-Pole at least 66 - in from the floortake the measurement from the
bottom of the shelf (that puts the pole at - about 64 in. from the floor). For exceptionally
tall people, increase the height to keep long - clothes off the floor.
- Double Pole If pants are folded over a hanger,
they only need half the hanging height as a - long dressabout 34 in. from the bottom of the
shelf to the floor. Shirts are longer and - require 40 in. from the bottom of the shelf.
Because most of the clothes in our closets today - are pants and shirts, Double Shelf-and-Pole
should predominate in every closet, which - doubles the storage space. To make the job of
installing shelves easier and to allow - homeowners the choice of changing the arrangement
of their clothes, I separate all Double - Poles by 42 in., which makes the top shelf 84 in.
from the floor.
11
- The Top Shelf The top shelf should run
completely across the closet, and around - all three walls in a u-shaped closet, so the same
84-in. height determines the second - or top shelf over a Single Shelf-and-Pole, too
(see diagram, above). In most 8-ft. - closets, 12 in. of space remains between the top
shelf and the ceiling, which is - enough room for shoe boxes, hat boxes and other
storage. - Sweater Shelves A typical bank of sweater
shelves should begin 16 in. from the - floor, which allows room for tall boots on the
floor. Succeeding shelves should be - spaced about 12 in. apart. If the top shelf is
installed at 84 in. from the floor, this - sweater shelf arrangement should result in a
somewhat even spacing.
12
- Shoe Shelves Shoes only require about 7 in. of
height (that includes high-tops - and pumps). To get the most from your closet
space, design shelving - specifically for shoes and dont rely on
12-in.-spaced shelves for shoe storage. - An 84-in. tall bank of shelves, with the first
shelf 16 in. from the floor, can - include 4 shoe shelves and 3 sweater shelves (see
diagram). Of course, if - theres room, and youre expecting a lot of
shoes, build an entire bank of shoe - shelves.
- The only shelf in a closet that wont align
horizontally with other shelves is the - Single Shelf-and-Pole, because its set at 68 in.
from the floor. The 16-in. space - between the Single Shelf-and-Pole and the top
shelf can be divided again by an - additional shelf, which creates a perfect
location for a few pairs of shoes.
Recommended
