
World's Most Popular Hands-On Laparoscopic Training Institute - PowerPoint PPT Presentation
Title:
World's Most Popular Hands-On Laparoscopic Training Institute
Description:
laparoscopic training, laparoscopic article, laparoscopic course World Laparoscopy Hospital provides learning by doing. It provides real-world laparoscopic surgery experience by allowing the trainee to get hands-on directly with whatever surgeons are learning and developing a sense of empowerment. After taking this laparoscopic training course, surgeons and gynecologists can perform laparoscopic surgery themselves on their patients with confidence. – PowerPoint PPT presentation
Number of Views:3
Title: World's Most Popular Hands-On Laparoscopic Training Institute
1
AbdominalAccessTechniques
Prof. Dr. R. K. Mishra
- INTRODUCTION
- Minimal access surgery (MAS) a new surgical and
interventional approach, was called by different
name and one of the popular is minimally
invasive surgery. However, unique complications
are associated with gaining access to the
abdomen for laparoscopic surgery. The technique
of first entry inside the human body with
telescope and instruments is called access
technique. The hallmark of the new approaches is
the reduction in the trauma of access. The
technique for access to the peritoneal cavity,
choice of access technique, placement locations,
and port placement is very important in MAS.
Technique of access is different for different
minimal access surgical procedures. Thoracoscopy,
retroperitoneoscopy, axilloscopy, and
arthroscopy all have different ways of access.
In this chapter, we will discuss various
abdominal access techniques. - It is important to know that approximately 20 of
laparoscopic complications are caused at the
time of initial access. Developing access skill
is one of the important achievements for the
surgeon practicing MAS. First entry or access in
laparoscopy is of two types (1) closed access
and - (2) open access.
- ANATOMY OF ANTERIOR ABDOMINAL WALL
- Knowledge of the surgical anatomy of the
abdominal wall is essential for the safe access
in laparoscopic surgery. Laparoscopic
instruments traverse the skin, subcutaneous fat,
variable myofascial layers, preperitoneal fat,
and parietal peritoneum. There are three large,
flat muscles (external oblique, internal
oblique, and transversus abdominis) and one long
vertically oriented segmental muscle (rectus
abdominis) on each side. The layers of the
abdominal wall in the midline include skin,
subcutaneous fat, and a fascial layer (linea
alba) that is a coalescence of the anterior and
posterior rectus sheath. Four major arteries on
each side are also present which form an
anastomotic arcade that supplies the abdominal
wall. The superior and inferior epigastric
artery and the branches provide the major blood
supply to the rectus abdominis muscle and other
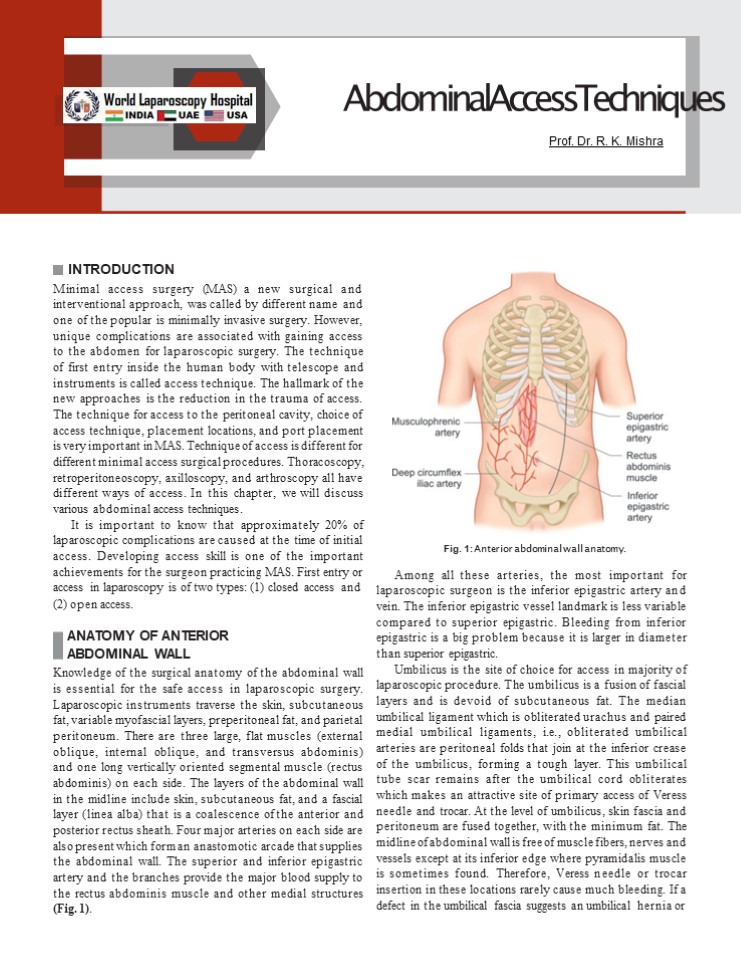
medial structures (Fig. 1).
Fig. 1 Anterior abdominal wall anatomy. Among
all these arteries, the most important for
laparoscopic surgeon is the inferior epigastric
artery and vein. The inferior epigastric vessel
landmark is less variable compared to superior
epigastric. Bleeding from inferior epigastric is
a big problem because it is larger in diameter
than superior epigastric. Umbilicus is the site
of choice for access in majority of laparoscopic
procedure. The umbilicus is a fusion of fascial
layers and is devoid of subcutaneous fat. The
median umbilical ligament which is obliterated
urachus and paired medial umbilical ligaments,
i.e., obliterated umbilical arteries are
peritoneal folds that join at the inferior crease
of the umbilicus, forming a tough layer. This
umbilical tube scar remains after the umbilical
cord obliterates which makes an attractive site
of primary access of Veress needle and trocar.
At the level of umbilicus, skin fascia and
peritoneum are fused together, with the minimum
fat. The midline of abdominal wall is free of
muscle fibers, nerves and vessels except at its
inferior edge where pyramidalis muscle is
sometimes found. Therefore, Veress needle or
trocar insertion in these locations rarely cause
much bleeding. If a defect in the umbilical
fascia suggests an umbilical hernia or
2
76
SECTION1 Essentialsof Laparoscopy
if any midline incision scar of previous
laparoscopy is found or if any anomalies of the
urachus may also exist umbilicus should not be
used for primary access. If an umbilical hernia
or urachal anomaly is suspected, alternative
access sites may need to be considered. The
colon is attached to the lateral abdominal wall
along both gutters and puncture laterally for
secondary trocars should be under video control
to avoid visceral injury. When left subcostal
site is chosen for access it should be 2 cm
below the costal margin in midclavicular line
called Palmers point. The costal margin
provides good resistance as the needle is
introduced. When puncture site lateral to the
midline is used, it is prudent to choose location
lateral to the linea semilunaris to avoid injury
of superior and inferior epigastric vessels. In
obese patients, the linea semilunaris may not be
visible. In these, location of inferior artery
can be localized by careful transillumination. Ac
cess to preperitoneal space is gained by
penetrating almost all the layers of abdominal
wall except peritoneum. The open technique of
access is preferable in this situation. After
incising the fascia with the scalpel, fingered
dissection is advisable to avoid puncture of
peritoneum.
entry into a body cavity without traumatizing the
underlying organs (Fig. 4) . Maximum flow of gas
through the eye of Veress needle is 2.5 L/min
only but for safety it should be kept at 1 L/min
to prevent accidental gas embolism (Fig. 5).
This is a blind technique and most practiced way
of access by surgeons and gynecologists
worldwide. When choosing site of closed access,
previous surgical incisions, or any anatomical
abnormality, should be noted. Sites that have not
been previously instrumented are preferred for
initial access. Closed technique of access
merely by Veress needle insertion and creation
of pneumoperitoneum is an easy way of access but
it is not possible in some of the minimal access
surgical procedures such as axilloscopy,
retroperitoneoscopy, and totally extraperitoneal
approach of hernia repair. In general, closed
technique by Veress needle is possible only if
there is a preformed cavity like
abdomen. Creation of pneumoperitoneum is one of
the most important steps in laparoscopy. The aim
is to build up a good protective cushion of gas
to ensure the safe entry of trocar and cannula.
Veress Needle Insertion The standard method of
insufflations of the abdominal cavity is via a
Veress needle inserted through a small skin
incision over inferior crease of umbilicus.
Disposable and reusable metal Veress needles are
available commercially in different lengths
(820 cm), i.e., long for obese patients, short
for thin or pediatric patients. Before using
Veress needle, it should be checked for its
patency and spring action. Spring action of
Veress needle can be checked by pulling the head
out. The disposable
CLOSED ACCESS TECHNIQUE To start any laparoscopic
procedure the peritoneal cavity needs to be
accessed, first to establish pneumoperitoneum
and subsequently to place a port for the
laparoscope and add the placement of additional
ports for various laparoscopic instruments. In
closed access technique, pneumoperitoneum is
created by Veress needle (named for Janos
Veress) (Fig. 2) . The Veress needle was
originally developed by Janos Veress to give
patients with tuberculosis iatrogenic
pneumothorax without damaging the underlying
lung parenchyma (Fig. 3). It has a small-bore
(1.82.2 mm) needle with a spring-loaded
protective obturator with a side hole that
recoils to cover the end of the needle, allowing
Fig. 3Veress needle.
Fig. 2 Veress needle inventorJanosVeress.
Fig. 4 PartsofVeress needle.
3
77
CHAPTER 6 Abdominal AccessTechniques
Operating Room Setup An organized well-equipped
operation theater is essential for successful
laparoscopy. The entire surgical team should be
familiar with the instruments and their function.
Each instrument should be inspected periodically
for loose or broken tips even if the same
instrument was used during a previous procedure.
It is necessary to confirm proper sterilization
of instruments because the surgeon ultimately is
responsible for the proper functioning of all
instrument and equipment. The entire instrument
should be placed according to wish of the
surgeon so that it should be ergonomically
perfect for that surgery. The coaxial alignment
should be maintained. Coaxial alignment means
the eye of the surgeon, target of dissection,
and monitor should be placed in same axis.
Fig. 5 Eye ofVeress needle.
Patient Position Initially at the time of
pneumoperitoneum by Veress needle, patient
should be placed supine with 15 head down. The
benefit of this Trendelenburgs position is that
bowel will be pulled up and there will be more
room in pelvic cavity for safe entry of Veress
needle. It is important to remember that patient
should be placed in head-down position only if
surgeon is planning to insert Veress needle
pointing toward pelvis cavity. If surgeon is
planning to insert Veress needle perpendicular
to abdominal wall as in case of very obese
patient, previous midline incision or diagnostic
laparoscopy in local anesthesia, the patient
should be placed in supine position otherwise
all the bowel will come just below the umbilicus
and there is increased risk of bowel injury. In
gynecological laparoscopic procedures or if
laparoscopy is planned to be performed together
with hysteroscopy, patient should be positioned
in lithotomy position and one assistant should
be positioned between the leg of patient (Fig.
6). Patients leg should be comfortably
supported by padded obstetric leg holders or
Allen stirrups which minimize the risk of venous
thrombosis. In these procedures, surgeon needs
to use uterine manipulator for proper
visualization of female reproductive organs. The
assistant seating between the legs of patient
will keep on watching the hand movement of
surgeon on monitor and he should give traction
with the handle of uterine monitor in
appropriate direction. If thoracoscopy or
retroperitoneoscopy is planned, then patient is
placed in lateral position (Fig. 7).
Veress needle spring action can be checked by
pressing the sharp end against any sterilized
draping. Insufflation via the Veress needle
creates a cushion of gas over the bowel for
insertion of the first trocar. Insufflation then
retracts the anterior abdominal wall, exposing
the operative field.
Preparation of Patient The patient should be nil
orally since the morning of surgery. In some of
the procedure such as laparoscopic hysterectomy
or colorectal surgery where distended bowel may
interfere, it is good to prepare bowel prior to
the night of surgery by giving some mild
purgative (polyethylene glycol). Bowel
preparation can minimize the need of accessory
port to retract the bowel. Before coming to
operation theater, patient should always void
urine. The full urinary bladder may get
perforation at the time of insertion of Veress
needle or trocar. If the laparoscopic procedure
is of short duration and is going to be
performed of upper abdomen, then Foley
catheterization is not necessary. If
gynecological operative surgery or any major
general surgical lower abdominal procedure has to
be performed (such as hernia or adhesiolysis),
it is wise to insert Foley catheter. If surgeon
is going to perform any upper abdominal
procedures such as cholecystectomy,
fundoplication, duodenal perforation, hiatus
hernia, etc., it is good practice to have
nasogastric tube in place. A distended stomach
will not allow proper visualization of Calots
triangle and then surgeonhas to apply
moretraction overfundus or Hartmanns pouch, and
this may cause tenting of common bile duct (CBD)
followed by accidental injury. In gynecological
or lower abdominal minor laparoscopic procedure,
it is not necessary to put nasogastric tube. In
MAS, shaving of skin is not must and if
necessary, it should be done on operation table
itself by surgeon.
Position of Surgical Team The laparoscopic
surgeon is very much dependent and helpless with
eye fixed on monitor. At the time of laparoscopic
surgery, surgeon is largely depending on his
correct standing position. If the surgery is of
upper abdomen, French surgeons like to stand
between the legs of patient, popularly known as
4
78
SECTION1 Essentialsof Laparoscopy
Fig. 7 Patient position in retroperitoneoscopy.
Fig. 6 Patient position in gynecological
laparoscopy.
B Figs. 8A and B American versus French position.
A
French position (Figs. 8A and B) . The American
surgeons like to operate from left in cases of
upper abdominal surgery such as cholecystectomy
called as American position. It is not always
wise to remain standing in any one fixed
position and surgeon can walk to the other side
of operation table to achieve proper ergonomics.
In most of the cases at the time of initial
access, right-handed surgeon should stand on
left side of the patient so that he can hold the
Veress needle with right dominant hand. If
surgeon is left-handed, he should stand right to
the patient at the time of access and insert the
Veress needle or trocar with left hand. This
helps in inserting Veress needle and trocar
toward pelvis by dominant hand. Once the initial
Veress needle and first optical trocar has been
introduced surgeon should stand opposite to the
organ which he wants to operate on. Once all the
ports are in position, the surgeon should come
opposite to the side of pathology to start
surgery and he should achieve coaxial alignment
means eye of the surgeon, target of dissection,
and center of monitor should be in one linear
axis. In cholecystectomy, appendectomy,
right-sided hernia or right ovarian cyst,
surgeon should stand left to the patient. In
left-sided pathology such as left ovarian cyst
and left-sided
Fig. 9 Surgeonsstands left to the patient in
most of the right-sided pathology.
hernia, it is ergonomically better for surgeon to
stand right to the patient (Fig. 9). In most of
the upper abdominal surgery, camera assistant
should stand left to the surgeon and in lower
abdominal surgery, he or she should stand right
to the surgeon. Camera
5
79
CHAPTER 6 Abdominal AccessTechniques
assistant while holding telescope can pass his or
her hand between body and arm of surgeon so that
sometime surgeon can help him to focus his
camera correctly. Camera assistant can be placed
opposite to the surgeon to stand but in this
case, it is better to have two monitors on both
the side of patient, one for surgeon and one for
camera stand and other members of surgical team.
The surgeon should work in the most comfortable
and less tiring position possible with shoulder
relaxed, arms alongside of the body, elbows at
90 angle and forearm horizontal.
laser irradiation. For short operative procedures
such as sterilization or drilling, under local
anesthetic N2O may also be used. During
prolonged laparoscopic procedure, N2O should not
be a preferred gas for pneumoperitoneum because
it supports combustion better than air. CO2 when
comes in contact with peritoneal fluid converts
into carbonic acid. Carbonic acid irritates
diaphragm causing shoulder tip pain and
discomfort in abdomen. Carbonic acid has one
advantage also that it alters pH of peritoneal
fluid (acidotic changes) and it is mild
antiseptic, so the chances of infection may be
slightly less compared to any other gas. Helium
gas being inert in nature is also tried in many
centers, but it does not have any added benefit
over CO2. Helium may be a suitable alternative
to CO2 for creating pneumoperitoneum in patients
with severe cardiorespiratory disease. Some of
the study suggest that pneumoperitoneum with
helium will not be associated with profound
circulatory depression or oxygen transport
abnormalities. In addition, the use of helium is
not associated with acid-base disturbances,
although central venous filling pressures are
similarly increased as with the use of CO2
pneumoperitoneum. However, helium is expensive
gas and because of its low water solubility
helium has a lower safety margin than CO2 in the
event of gas embolism.
Preparation for Access Before starting access,
abdomen should be examined for any palpable
lump. It is wise to tell the patient to void
urine before coming to operating room but if the
bladder is found full at the time of palpation.
Foley catheter and nasogastric tube should be
applied once patient is anesthetized. Remember
that full bladder or distended stomach may be
injured very easily by Veress needle or
trocar. Once the patient is cleaned painted and
draped, all the connection should be attached,
followed by focusing and white balancing of
camera. At the time of focusing, the distance
between the gauge piece and tip of the telescope
should be 68 cm.
Choice of Gas for Pneumoperitoneum At first,
pneumoperitoneum was created by filtered room
air. Carbon dioxide (CO2) and nitrous oxide (N2O)
are now preferred gas because of increased risk
of air embolism with room air. CO2 is used for
insufflation as it is 200 times more diffusible
than oxygen and 20 times more absorbable than
room air. It is rapidly cleared from the body by
the lungs and will not support combustion. N2O
is only 68 as rapidly absorbed in blood as CO2.
N2O has one advantage over CO2 that it has mild
analgesic effect, and hence no pain if
diagnostic laparoscopy is performed under local
anesthesia. CO2 has the advantage of being
noncombustible and allows the concomitant use of
electrocoagulation and
Introduction of Veress Needle To access the
abdomen with a closed approach using a Veress
needle
- Apply two Allis forceps to evert the inferior
crease of umbilicus (Fig. 10). - Give a 2-mm smiling incision in the skin and the
subcutaneous tissue over inferior crease of
umbilicus (Fig. 11). - Hold shaft of the Veress needle as a dart (Fig.
12). - Guard the length of Veress needle needed to reach
the peritoneal cavity (Fig. 13). - Place the needle through the incision to the
level of the fascia (Fig. 14).
Fig. 10Two Allisforceps isapplied over crease of
umbilicus.
Fig. 112-mmstab wound over inferior crease of
umbilicus.
6
80
SECTION1 Essentialsof Laparoscopy
Fig. 12 Veress needle should be held like a dart.
Fig. 13Guard the required length ofVeress needle.
- Grasp and elevate the abdominal wall with your
left hand. It is important to note that grasping
only the skin while not including the fascia may
increase the rate of failed entry (Fig. 14). - Hold the Veress needle just over the previously
incised site and insert it through the incision
at a 45 angle toward anus but keep
perpendicular to the abdominal wall. This can be
only achieved by lifting the abdominal wall
adequately by left hand (Fig. 14). - While inserting the Veress needle feel for two
pops. The first occurs when the needle passes
through the abdominal fascia and the second as
it passes through the parietal peritoneum. More
lateral access sites may have additional pops
if more than one layer of fascia is traversed. - As soon as the needle enters the peritoneal
space, the displaced hub of the needle will
click as the protective sheath recoils to
cover the end of the needle. After entering in
abdominal cavity, the intra-abdominal needle
will also move more freely than a needle within
the abdominal wall. - Veress needle should be held like a dart (Fig.
12). At the
Fig. 14Veress needleshould be pointed toward
anusbut perpendicular to abdominal wall.
abdominal wall may be difficult. In multipara
patient, lifting lower abdominal wall is very
easy. Several tests are available for confirming
Veress needle placement. These include one of
the following
NeedleMovement Test Once the Veress needle is
inside the abdominal cavity, the tip of Veress
needle should be free and if surgeon will gently
move the tip of needle there should not be feel
of any resistance. It is very important to
remember that Veress needle should not be moved
inside the abdominal cavity much, otherwise
there is a risk of laceration of bowel to be
punctured.
time of insertion, there should be 45 of
elevation angle. Elevation angle is angle
between instrument and body of patient. To get
an elevation angle of 45 the distal end of the
Veress needle should be pointed toward anus (Fig.
14). To prevent creation of preperitoneal slip
of tip of Veress needle, it is necessary that
Veress needle should be perpendicular to the
abdominal wall. However, there is a fear of
injury of great vessels or bowel if Veress
needle is inserted perpendicular to the
abdominal wall. To avoid both the difficulty
(creation of preperitoneal space and injury to
bowel or great vessels), the lower abdominal
wall should be lifted in such a way that it
should lie at 90 angle in relation to the Veress
needle but in relation to the body of patient
Veress needle will be at an angle of 45 pointed
toward anus. Lifting of abdominal wall should be
adequate so that the distance of abdominal wall
from viscera should increase. If less than
required dose of muscle relaxant is given in
muscular patient, lifting of
IrrigationTest A 10-mL syringe should be taken in
one hand and surgeon should try to inject at
least 5 mL of normal saline through Veress
needle. If tip of Veress needle is inside the
abdominal cavity, there will be free flow of
saline otherwise some resistance is felt in
injecting saline (Fig. 15).
AspirationTest After injecting saline, surgeon
should try to aspirate that saline back through
Veress needle (Fig. 16). If the tip of Veress
7
81
CHAPTER 6 Abdominal AccessTechniques
Fig. 15 Irrigation test.
Fig. 16 Aspiration test.
needle is in abdominal cavity, the irrigated
water cannot be sucked. But if it is in
preperitoneal space or in muscle fiber or above
the rectus the injected water can be aspirated
back. In aspiration test, if more irrigated
fluid is coming, then surgeon should suspect
ascites, some cysts or perforation of urinary
bladder. If fecal matter is seen then perforation
of bowel may be the reason and if blood is
coming then the vessel injury is the cause. If
any fresh blood or fecal fluid is aspirated in
the syringe, surgeon should not remove the Veress
needle and urgent laparotomy is required.
Leaving Veress needle in position is helpful in
two ways. First, it is easy to find the
punctured area after laparotomy and secondly, the
further bleeding will be less.
of lifting abdominal wall was advocated by Johns
Hopkins University but after some time it was
realized that towel clip technique increases the
distance of skin from rest of the abdominal wall
more than distance of abdominal wall from
viscera. Abdominal wall should be held full
thickness with the help of thenar, hypothenar
and all the four fingers (Fig. 14). It is lifted
in such a way that angle between Veress needles
to abdominal wall should be 90 and angle between
Veress needle and patient should be 45. At the
time of entry of Veress needle, surgeon can hear
and feel two click sounds. The first click sound
is due to rectus sheath and second click sound
is due to puncture of peritoneum. Anterior and
posterior rectus forms one sheath at the level of
umbilicus, so there will be only one click for
rectus. If any other area of abdominal wall is
selected for access surgeon will get three click
sounds. Once these two click sound is felt,
surgeon should stop pushing Veress needle
further inside and he should use various
indicators to know how far he has accessed. Once
the desire length of Veress needle is introduced
in abdomen, the tubing of insufflator should be
attached to Veress needle (Fig. 15). It is
important to keep nice hold on Veress needle
throughout while gas is flowing otherwise
Veress needle can slip out and may create
preperitoneal insufflation (Fig. 16).
Hanging DropTest Few drops of saline should be
poured over the Veress needle and abdominal wall
should be lifted slightly, if tip of the Veress
needle is inside the abdominal cavity the hanging
drop should be sucked inside because inside the
abdomen, there is negative pressure. If tip of
the Veress needle is anywhere else, the hanging
drop test will be negative (Figs. 17A and B) .
Once it is confirmed that Veress needle is inside
the abdominal cavity, the tubing of insufflator
is attached and flow is started.
Measurement of Intra-abdominalPressure Measure
intra-abdominal pressure by attaching the Veress
needle to the laparoscopic insufflator. An
intra-abdominal position of the needle is
suggested for intra-abdominal pressure 10 mm
Hg. In one large observational study,
confirmation of low intraperitoneal pressure was
the most reliable method to confirm Veress
needle placement. Once an intra-abdominal
position of the needle is verified, initiate gas
insufflation (typically CO2). A properly placed
Veress needle will allow free flow of gas.
Tympany should be appreciated with percussion of
the abdomen in the right upper quadrant. For
many years, surgeons have been using towel clip
to elevate the abdominal wall. This towel clip
technique
Insufflation ofGasTest,QuadromanometricTest Tubing
of the insufflator should be tightly attached
with the help of Luer lock of Veress needle
(Figs. 18 and 19) . For safe access, surgeon
should always see carefully all the four
indicators of insufflator at the time of
creation of pneumoperitoneum. If the gas is
flowing inside the abdominal cavity, there
should be proportionate rise in actual pressure
with total gas used. Suppose only with the entry
of 200300 mL of gas, if actual pressure is equal
to preset pressure of 12 mm Hg, that means gas
is not going in free abdominal cavity, it may be
in preperitoneal space or inside omentum or may
be in bowel. If gas is flown gt5 L without any
distention of abdomen that may be due to leakage
or gas may be going inside the vessel.
8
83
CHAPTER 6 Abdominal AccessTechniques
B Figs. 20A and B Quadromanometric indicators.
A
Flow rate This reflects the rate of flow of CO2
through the tubing of insufflator. When Veress
needle is attached, the flow rate should be
adjusted to 1 L/min. Studies were performed over
animal in which direct intravenous (IV) CO2 were
administered, and it was found that risk of air
embolism is less if rate is within 1 L/min. At
the time of access using Veress needle
technique, sometime Veress needle may
inadvertently enter inside a vessel but if the
flow rate is 1 L/min there is a less chance of
serious complication. When initial
pneumoperitoneum is achieved and cannula is
inside abdominal cavity, the insufflators flow
rate may be set at maximum, to compensate loss
of CO2 due to use of suction irrigation
instrument. This should be remembered that if
insufflator is set to its maximum flow rate then
also it will allow flow only if the actual
pressure is less than preset pressure otherwise
it will not pump any gas. Most of the surgeons
keep initial flow rate with Veress needle to 1
L/min and as soon as they confirm that gas is
going satisfactorily inside the abdominal cavity
by percussion examination and seeing
obliteration of liver dullness (Fig. 21), then
they increase flow rate to 3 L/min. No matter
how much flow rate you set for Veress needle, the
eye of normal caliber Veress needle can give
away CO2 flow at maximum 2.5 L/min. Once cannula
is in place flow rate can be increase but when
the flow of CO2 is gt10 L/min inside the
abdominal cavity through cannula and there is
leak, there is always a risk of hypothermia and
dryness of intestine. To avoid this hypothermia
in all modern microprocessor controlled
Laproflattor, there is an electronic heating
system which maintains the temperature of
CO2. Total gas used As soon as 100200 mL of
gas is inside the abdominal cavity, surgeon
should do percussion of the right hypochondrium
and liver dullness should obliterate with
tympanic sound (Fig. 21). This is the fourth
indicator of insufflator. Normal size human
abdominal cavity needs 1.5-L CO2 to achieve
intra-abdominal actual pressure of 12 mm Hg. In
some big size abdominal cavity and in
Fig. 21Tapping overright hypochondrium will
demonstrate obliteration of liver
dullness. multipara patients, sometimes we need 3
L of CO2 (rarely 56 L) to get desired pressure
of 12 mm Hg. Whenever there is less or more
amount of gas used to inflate a normal abdominal
cavity, surgeon should suspect some errors in
pneumoperitoneum technique. These errors may be
leakage or may be preperitoneal space creation
or extravasation of gas.
PRIMARY TROCAR INSERTION Technical errors in the
insertion of trocars after creation of
pneumoperitoneum are the most common causes of
injury, resulting from inadequate stabilization
of the abdominal wall, excessive resistance to
trocar insertion, and excessive, misdirected or
uncontrolled force applied by the surgeon along
the axis of the trocar. It is important to
stabilize the abdominal wall by full
insufflation, complete muscle relaxation, to
increase the distance between the anterior
abdominal wall and the retroperitoneal vessels
and the abdominal organs. It is important to
ensure that the skin incision is of enough
length and that the reusable trocar tip is sharp
so that no resistance is offered.
9
84
SECTION1 Essentialsof Laparoscopy
Trocar and cannula design currently available
have several basic features in common. They come
in a variety of sizes and the central trocar may
have a pyramidal, conical or rounded tip (Figs.
22 and 23) . They have a valve system and a gas
input with a tap. These cannulas have flap,
bicuspid or magnetic valves and care should be
taken when passing telescope through the port
that lens of telescope should not hit the valve
otherwise it can be damaged. Some disposable
cannula has a safety system with a cylinder jumps
forward after penetration of abdominal wall and
forms a shield over the sharp trocar tip. This
is not fool proof due to shield lag. In the most
recent disposable cannula, the trocar itself is
spring loaded. Few optical trocars are also
available which has been discussed in Chapter 3
Laparoscopic Equipment and Instrument. The first
trocar and cannula inserted is usually 11 mm in
diameter. This will accommodate a 10-mm telescope
and leave enough space in the cannula for rapid
gas insufflation, if required.
incision can be used in obese patient. Before
introduction of trocar, surgeon should confirm
pneumoperitoneum. After adequate distention of
abdominal cavity, the actual pressure should be
equal to the preset pressure and gas flow should
be stopped. Before introduction of trocar, the
initial 2-mm stab puncture wound of skin for
Veress needle should be extended to 11 mm (Fig.
24). It should be remembered that most common
cause of forceful entry inside the abdominal
cavity with primary trocar is small skin
incision. To avoid inadvertent injury of bowel
due to forceful uncontrolled entry, the incision
of skin should not be lt11 mm in size. The skin
incision for trocar should be smiling in shape
(U-shaped) along the crease of umbilicus to get
a better cosmetic value. After giving 11-mm
incision with 11 number blades, surgeon should
spread fatty tissues with Kelly clamp or mosquito
forceps (Fig. 25) . This will also dilate the
obliterated vitellointestinal duct which was
demonstrated first time by Scandinavian surgeons
so it is called Scandinavian technique.
Steps of Primary Trocar Insertion Patient
Position As for Veress needle insertion, patient
should be placed supine with 1020 head down.
The cephalocaudal relationship between the
aortic bifurcation and the umbilicus has been
studied radiologically. The umbilicus is often
located directly above or cephalad to the aortic
bifurcation and is consistently located cephalad
to where the left common iliac vein crosses the
midline. The aortic bifurcation is located more
caudal to the umbilicus in the Trendelenburgs
position than in the supine position.
Introduction of Primary Trocar Surgeon should
hold the trocar in proper way. Head of trocar
should rest on thenar eminence, middle finger
should encircle air inlet and index finger
should point toward sharp end (Fig. 26). After
holding the trocar properly in hand, full
thickness of abdominal wall should be lifted by
fingers thenar and hypothenar muscles. After
creation of pneumoperitoneum, lifting of
abdominal wall is difficult because it slips. To
overcome this, it should be grasped to counter
the pressure exerted by the tip of trocar.
Site The same site of Veress needle entry should
be used for primary trocar insertion. Inferior
or superior crease of umbi- licus can be used in
average built patient and transumbilical
Angle of Insertion Initially, angle of insertion
for primary trocar should be perpendicular to
abdominal wall but once surgeon feels
Fig. 22Reusable trocar and cannula.
Fig. 23Disposable trocar and cannula.
10
85
CHAPTER 6 Abdominal AccessTechniques
Fig. 242-mmstab wound should be extended to 11mm.
Fig. 25 Mosquito forceps tip introduced through
stab wound.
Fig. 26The trocar and cannula should be held
like a pistol.
Fig. 27 Insertion of trocar byscrewing fashion.
Fig. 28 Insufflator tubing in reattached once
optical port is introduced.
Fig. 29 Introduction of telescope.
giving way sensation, the trocar should be tilted
to 6070 angle. Insertion of trocar should be
in screwing fashion in case of pyramidal trocar.
In disposable bladed trocar, screwing the trocar
should not be done (Fig. 27). Confirmation of
Entry of Primary Trocar
Once the trocar entry in abdominal cavity is
confirmed, cannula is stabilized with left hand
and trocar is removed by right hand. After
removing trocar, cannula is pushed slightly
further inside the abdominal cavity to prevent
coming cannula in preperitoneal space with
movement of abdominal wall with respiration.
Once cannula is in place tubing of insufflator
is attached again and flow is restarted to
refill the CO2 at preset pressure (Fig. 28).
Telescope is introduced slowly keeping the
oblique cut edge down in case of 30 telescope
(Fig. 29). At the time of introduction of
telescope, it is wise to keep valve of cannula
open to prevent scratch over tip of telescope.
- Audible click if disposable trocar or safety
trocar is used. - Whooshing sound if reusable trocar is used (gas
passes from the small hole at the tip of
pyramidal shaped trocar to the head of trocar). - Loss of resistance felt both in disposable as
well as reusable trocar.
11
86
SECTION1 Essentialsof Laparoscopy
Once the telescope is inside, the elevation angle
of the telescope should be 90 with panoramic
vision. The site just below the entry of primary
port is examined for any vessel or bowel injury
(Fig. 30). Sometime, there may be few drops of
blood found just below the site of entry but
these few drops of blood are trickled blood
through umbilical wound. If surgeon has any
doubt about perforation of bowel or injury to
vessel, he should evaluate this area again after
putting other ports.
patient, it can be introduced same way but if
surgeon is not able to bend enough to opposite
side, his right index finger can be placed over
the head of the trocar and left hand should
guard the shaft of cannula. Alternatively,
trocars of opposite side can be introduced by
the assistant (Fig. 32). With slow rotatory
movement of right hand, first the tip of trocar
should be perpendicular to the skin but as soon
as tip of trocar is seen direction of trocar
should change toward the anterior abdominal
wall. Alternatively, surgeon can go to another
side of the patient and he can introduce the
trocar in conventional way. In same manner, all
the working port should be introduced, and
instruments are inserted to start the surgery
(Fig. 33). It should be remembered that distance
between two ports should never be lt5 cm. The
Baseball diamond concept discussed in Chapter
7 Principle of Laparoscopic Port Position is
the most appropriate method to decide the site
of introduction of working port. The positioning
of operative ports is an important factor in
determining the ease with which a procedure is
carried out. It is a skill which must be learnt.
Working Ports To select the site for secondary
port, transillumination with illuminated
telescope tip should be done first to locate
avascular area to avoid injury of subcutaneous
vessels. With the help of mosquito forceps, any
remaining skin fiber is breached, and the
subcutaneous fat should be cleared. Initially,
the direction of entry of trocar is perpendicular
but as soon as the tip of trocar is seen, the
direction of trocar should be changed toward the
free space to prevent any injury of underlying
viscera (Fig. 31).
Subsequent Ports Subsequent ports are inserted
under direct vision at locations appropriate for
the procedure and to the anatomy of the
individual. If the port is on the opposite side
of the
Slipping of Port Sometimes, the port wound
becomes bigger than the diameter of cannula and
it tends to slip out frequently.
Fig. 30 Initial diagnosisof injury after access.
Fig. 31 Introduction of secondary port.
Fig. 32 Introduction of secondary trocar.
Fig. 33 All the portsand instrumentsshould be
positioned properly without entangling each
other.
12
87
CHAPTER 6 Abdominal AccessTechniques
In these situations, a simple stitch over skin
and fixing of the cannula with the help of
sterile adhesive tape helps. In pediatric
laparoscopic surgery, stabilizing the port is
necessary. Reusable metal cannula has trumpet or
flap valves. The flap valves can be manually
opened when introducing or removing an
instrument. This avoids damaging delicate
instruments such as tip of telescope or blunting
sharp instruments such as aspiration needle and
scissors. A reducer tube is used with large
cannula to maintain the gas seal and this
automatically opens the valve. Several cannulas
modeled on the Hasson cannula is available for
use during open laparoscopic procedures.
Different sized converters (gaskets) are
available for disposable cannula to maintain the
gas seal.
useful when there is a concern for abdominal wall
adhesions in a patient with a prior
laparotomy. In this, there is a direct entry by
open technique, without creating
pneumoperitoneum and insufflator is connected
once blunt trocar is inside the abdominal cavity
under direct vision. There are various ways of
open access such as Hassons technique,
Scandinavian technique, and Fielding
technique. Some surgeons and gynecologists
practice blind trocar insertion without
pneumoperitoneum. The incidence of injury due to
this type of access is much higher. This type of
direct trocar entry is practiced by gynecologists
for sterilization. Sterilization may be
performed because in multipara patients the
lower abdominal wall is lax making the fascia
thinner and easy elevation by hand is possible.
Bleeding due to accidental damage to a major
vessel during this initial stage is one of the
most dangerous complications of laparoscopic
surgery. The Hasson trocar system was initially
developed for laparoscopy in patients who have
had a previous laparotomy. After seeing benefit
of open access technique, many surgeons started
using open access technique routinely in all
their patients. An access wound was made using
traditional open techniques and the Hasson
trocar and cannula was designed to both fix the
port and seal this larger wound round the port.
It requires the use of sutures to prevent
slippage of port. This involved making a small
entry wound directly through the scar tissue of
the umbilicus and then dilating this up by
passage of a blunt, preferable conically tipped
trocar and cannula (Figs. 39 and 40) .
OPEN ACCESS Open access technique was developed
by Hasson in 1974 (Figs. 34 to 40) . The choice
of site may be based on the surgeons preference
or the presence of a previous regional incision
that may have adhesions. Hasson trocar is used in
open technique which is available both in
disposable and reusable model (Figs. 34 and 35)
. Open access technique is like minilaparotomy
and the cannula is introduced inside. Hassons
technique involves direct open visualization of
the tissues at every layer until the peritoneum
is opened, followed by placement of anchoring
sutures in the fascia to secure a conical
collar. The trocar is then placed through the
collar to establish pneumoperitoneum and access.
Disadvantages include persistent uncontrolled CO2
leakage in many cases, increased incision size,
and increased time for placement. This technique
generally adds to the length of the procedure,
taking longer to perform at the beginning and
the end of the procedure compared with a closed
Veress needle technique. Even though the Hasson
technique is most commonly used in the
periumbilical region, this method can be used
anywhere on the abdominal wall and is particularly
Steps of Open AccessTechnique A transverse
incision is made in the subumbilical region and
the upper skin flap is retracted with an Allis
forceps. The lower flap is retracted using a
small right-angled retractor. Subcutaneous
tissue is dissected till the linea alba and the
Fig. 34Disposable Hasson trocar.
Fig. 35Reusable Hasson trocar.
13
88
SECTION1 Essentialsof Laparoscopy
rectus sheath is visualized. Stay sutures are
taken on either side of the midline.
- Surgeon should insert his finger to feel all
around inside the abdominal cavity to feel any
possible adhesion. - Small tiny adhesion felt can be broken with
gentle sweeping movement of finger. - Blunt trocar-cannula should be inserted for the
first port after visualizing the intraperitoneal
viscera (Fig. 39). - Care is taken not to make a big incision cannula
dilates the smaller incision to give an airtight
fit. - If incision is big, rectus string should be
tightened to hold the port in proper position
(Fig. 40). - Attach the gas (typically CO2) to the port and
insufflate the abdomen. Fast insufflation should
be avoided to prevent vasovagal shock.
- Make a transverse or longitudinal incision in the
skin just below the umbilicus (Fig. 36). - Stay suture is given both the end of transverse
incision. Both the stays are pulled up to make a
bridge-like elevation of rectus. - Rectus sheath is incised in the midline along the
line of linea alba pointing upward. Incision
should not penetrate the peritoneum otherwise
any adhesion with the peritoneum may be
punctured (Figs. 38A and B) . - Incise the fascia until a small amount of
preperitoneal fat is identified. Place stay
sutures in the fascial edges. - The stay sutures aid with retraction of the
abdominal wall and can be used to secure the
port to the fascia, preventing its displacement
during the surgery. - A hemostat is stabbed into the peritoneum while
holding the stays up (Fig. 37). - The give-way of the peritoneum can be felt as
peritoneum is perforated and then the hemostat
is opened to widen the opening. - Open the peritoneum bluntly, sweep the underside
of the abdominal wall with the index finger to
clear omentum or bowel, and confirm the absence
of adhesions in the region of the incision
(Figs. 36 to 38) .
Advantages of Open Technique
Definite, small risk of injury with blind Veress
needle technique irrespective of
experience. Particularly useful in previous
abdominal surgery or underlying adhesions. The
incidence of injury to adhesion although not
eliminated is significantly reduced by entry into
the peritoneal cavity under direct vision. There
is a decreased risk of injury to the
retroperitoneal vessels. The trocar is blunt,
and the angle of entry allows
Fig. 37 Hemostat isstabbed into the peritoneum.
Fig. 36 Skin incision for open technique.
B Figs. 38A and B Finger insertion after open
access will confirm adhesion.
A
14
89
CHAPTER 6 Abdominal AccessTechniques
Fig. 39 Introduction of Hasson trocar.
Fig. 40 Fixation of Hasson trocar.
Fig. 41Optical trocar.
Fig. 42Visiport.
the surgeon to maneuver the cannula at an angle,
which avoids viscera, while still assuring
peritoneal placement. The risk of
extraperitoneal insufflation is eliminated.
Placement under direct vision ensures that
insufflation of gas is actually into the
peritoneal cavity. The likelihood of hernia
formation is decreased because the fascia is
closed as part of the technique. Increasing
number of surgeons performing laparoscopy
without experience and in these group open
technique may be easy. Useful in muscular man
and children with strong abdominal wall. Useful
for gynecologists or surgeon lacking enough upper
arm strength to elevate the abdominal wall of
patient. An open technique, which involves
creating a minilaparotomy into which a special
cannula is inserted, may be adopted. This
procedure has its own complications and requires
skilled execution.
access system, and Visiport (Fig. 42). The way
each of these devices affects tissue dissection
as the tip advances differs in minor ways. These
devices are typically used for primary port
placement after Veress needle abdominal
insufflation or secondary port placement after
pneumoperitoneum has already been established.
OpenFieldingTechnique This technique developed by
Fielding in 1992 involves a small incision over
the everted umbilicus at a point where the skin
and peritoneum are adjacent. Fielding technique
is useful in patients with abdominal incisions
from previous surgery provided there is no
midline incision, portal hypertension and
recanalized umbilical vein, and umbilical
abnormalities, such as urachal cyst, sinus or
umbilical hernia. Thorough skin preparation of
the umbilicus is carried out and the everted
umbilicus is incised from the apex in a caudal
direction. Two small retractors are inserted to
expose the cylindrical umbilical tube running
from the undersurface of the umbilical skin down
to the linea alba. This tube is then cut from its
apex downward toward its junction with the linea
alba. Further, blunt dissection through this
plane permits direct entry into the peritoneum.
Once the peritoneal cavity is breached, the
primary port can be inserted directly, and
insufflation started. A blunt internal
Visual Entry Technique The visual entry technique
accesses the abdominal cavity with a specialized
optical port that has a transparent tip,
allowing each layer of the abdominal wall to be
seen with a 0 laparoscope as it is being
traversed (Fig. 41). Commercially available
optical trocar/ports include Optiview, Kii optical
15
90
SECTION1 Essentialsof Laparoscopy
trocar facilitates insertion of this port and an
external grip that can be attached to the port
assist to secure it in position. Suture is
usually not required to prevent gas leakage
because the umbilicus has been everted so the
angle of insertion of the laparoscopic port
becomes oblique and the incision required is
relatively small. However, one may be needed to
stabilize the port.
(Fig. 45). Special care should be taken that
there should not be hepatosplenomegaly. After
access though Palmers point, umbilicus site is
rechecked for any adhesion or other
abnormalities. If necessary, umbilicus port may
be introduced under vision.
MishrasTechnique This access technique we have
developed where little modification of Palmers
technique is done. We give incision 2 cm above
the costal margin in midclavicular line called
Mishras point (Fig. 46). To introduce Veress
needle at Mishras point abdominal wall is
stretched down and brought below the costal
margin. Advantage of this technique is there is
no incidence of hernia because after surgery
incision retract back to 2 cm above the costal
margin (Fig. 47). During insertion of Veress
needle or trocar through the palmers point, the
tip of the trocar should be pointed toward the
stomach to prevent injury of splenic flexor of
colon. It is very important that nasogastric tube
should be in place and stomach should be
deflated (Fig. 48).
Scarred Abdomen Additional precautions are
necessary during the access procedure in
patients with abdominal scars. It may be
inadvisable to insert the Veress needle below the
umbilicus in a patient with a scar in this area
(or an umbilical hernia). Insufflation through
unscarred such as subcostal region, or if this
is scarred, the iliac fossa is better. A general
guideline is to choose the quadrant of the
abdomen opposite to that of the scar.
Contraindications of Umbilical Entry
Previous midline incision Portal hypertension
with recanalized umbilical artery with advanced
cirrhosis of the liver Umbilical abnormalities
viz. urachal cyst, sinus, hernia.
ObesePatients In obese patient, incision site
should be transumbilical (base of umbilicus) for
the insertion of Veress needle, because it is
the thinnest abdominal wall and even in obese
patient, the amount of fat in transumbilical
region is less compared to other areas of the
abdominal wall. Direction of Veress needle entry
in obese patient should be perpendicular to
abdominal wall and patient should be in supine
position not in Trendelenburgs position (Fig.
49). Once the Veress needle is inside
pneumoperitoneum should be created up to 18 mm
Hg. Once the actual pressure is equal to preset
pressure and at least 1.53 L of gas is
introduced, Veress needle is removed. After
removing Veress needle, the initial incision is
enlarged up to 11 mm. After enlarging the initial
incision, fat should be cleared up to anterior
rectus sheath with the help of hemostat and
little finger. In obese patients, it is difficult
to lift the abdominal wall alone, assistants
hand should be asked for help to have a better
grip (Fig. 50). If bariatric surgery or
fundoplication is planned, then Veress needle
PNEUMOPERITONEUM IN SPECIAL CONDITIONS
PalmersTechnique This access was advocated by
Palmer in the 1940s because visceral parietal
adhesions are rarely encountered in this area
(Fig. 43). A small incision is made to allow the
insertion of the Veress needle through left
subcostal margin (Fig. 44). In addition, some
authors feel that because the abdominal wall in
the area is supported by the rigid thoracic wall,
insertion of the needle is more controlled than
in the periumbilical area. Palmers technique is
particular useful in cases where umbilical entry
is contraindicated, it is preferred to use left
upper quadrate for entry of Veress needle. The
Veress needle is introduced through left
hypochondria, i.e., Palmers point 2 cm below
the left subcostal margin in midclavicular line
Fig. 43 Palmers point of access.
Fig. 44 Palmers point 2cm below the costal
margin.
16
91
CHAPTER 6 Abdominal AccessTechniques
Fig. 45 Veress needle insertion through Palmers
point.
Fig. 46 Mishras point 2cm above the costal
margin.
Fig. 47 Veress needle insertion through Mishras
point.
Fig. 48Trocar insertion through Mishras point.
Fig. 49 Patient should be in supine position not
in Trendelenburgs position.
Fig. 50 Veress needle introduction in obese
patient.
and primary trocar need to be introduced
supraumbilical so that the telescope can show
the diaphragm and posterior mediastinum during
esophageal mobilization.
upper quadrant is preferred by many surgeons for
initial placement (Palmers point). If
supraumbilical access is used to perform
bariatric surgery assistants help should be
taken to lift the abdominal wall (Fig. 50)
. Longer port 20 cm in length is required in
case of obese patient (Fig. 51). The irrigation
test, aspiration test, the saline drop test, and
an opening pressure of lt10 mm Hg should all be
used to confirm proper placement of the needle.
When using the Hasson technique for patients
with a large amount of subcutaneous fat, the
incision should be made large enough to identify
the abdominal wall fascia and peritoneum.
ENTRY IN CASES OF MORBID OBESITY Abdominal access
can be challenging in the patient with a thick
abdominal wall however, all types of entry
access can be safely performed by experienced
surgeons. In morbid obese patient, the umbilicus
is well below the aortic bifurcation in supine
position. When using the Veress needle technique
in obese patients, the left
17
92
SECTION1 Essentialsof Laparoscopy
Fig. 51Optical trocar entry in obese patients.
Fig. 52 Ultrasound-guided entry.
The area beneath the Veress needle insertion site
inside the abdomen should be inspected for
injuries during the initial laparoscopic
evaluation of the abdomen.
complications occur at the time of abdominal
access for camera or port placement.
Complications can also arise from abdominal
insufflation, tissue dissection, and hemostasis.
Conversion to an open procedure may be needed to
manage complications that have been identified
intraoperatively, while others may be recognized
in postoperative period. Severe complications
such as vascular injury and bowel perforation
can be catastrophic and are the main cause of
procedure-specific morbidity and mortality
related to laparoscopic surgery. Improper trocar
insertion causes most of the operative
complications of laparoscopic surgery. Examples
are injury to the bowel, major vessels, bladder,
inferior epigastric vessels, and subcutaneous
emphysema. Other complications include thermal
injury to the bowel, abdominal wall contusions,
trocar site herniation with possible bowel
obstruction, and trocar site tumor implants.
However, the overall incidence of complications
is relatively low (about 2). There have been a
few case reports of vulvar edema and surgical
emphysema after laparoscopic surgery. The
mechanism is unclear, but the condition is
self-limited and resolves with conservative
management. Patients with an abdominal wall
hematoma from laparoscopic access who are
hemodynamically stable and with no signs of
hematoma expansion can be managed conservatively.
Ultrasound Visceral Slide There is a simple
preoperative test that can help to identify a
safe region for Veress needle insertion in the
scarred abdomen. The preoperative detection of
anterior abdominal wall adhesions by ultrasonic
scanning is a simple and reliable technique of
ultrasonic detection and mapping of abdominal
wall adhesions. In patients with portal
hypertension, a major risk factor upon entry
into the abdomen is injury to large, engorged
paraumbilical vessels in the anterior abdominal
wall (Fig. 52) . Major blood loss often
results from just entering the abdomen. Use of
ultrasound-guided access into the peritoneum for
laparoscopic surgery is also a safe and
effective approach in a patient presenting with
portal hypertension. This technique demonstrates
an effective tool in the surgical armamentarium
for entering the abdomen in patients with caput
medusae. Once the Veress needle has been
inserted, there should still be concern about the
risk of causing damage with the trocar. The
following techniques have been described for
this situation.
SoundingTest A fine spinal needle, attached to a
saline-filled syringe, is passed into the
inflated abdomen. As the needle is slowly
advanced, while aspirating, a stream of bubbles
is seen in the saline until the needle tip
contacts tissue. The needle is then withdrawn
toward the surface and the process repeated
several times, in different directions, thereby
mapping the gas filled cavity and any solid
structures.
Access Injuries The incidence of abdominal access
injury was 530/10,000 procedures. Bowel and
retroperitoneal vascular injuries comprised 76
of all injuries, and almost 50 of small and
large bowel injuries were unrecognized for at
least 24 hours. The overall reported rate of
vascular injury arterial or venous injury ranges
from 0.1 to 6.4/1,000 laparoscopies. Most
injuries involve minor vessels however,
underreporting is common. Bladed disposable
trocars with sharp blades are more likely to
injure vessels compared with smooth, pyramidal
tip trocars that push the vessel out of the way.
Complications of AccessTechnique The rate of
serious complications associated with a
laparoscopic approach is overall low. Half of the
18
93
CHAPTER 6 Abdominal AccessTechniques
The types and proportion of organ injury during
abdominal access were as follows
reducing intra-abdominal pressure to 8.0 mm Hg.
360 scan of the abdominal cavity should be
performed immediately to rule out
retroperitoneal bleeding. If bleeding or
expanding hematoma is seen, one should proceed
immediately to long midline laparotomy and
compression of the bleeding vessel. Blood should
be aspirated bleeder is exposed, and bleeding
should be controlled with vascular clamps. When
necessary, operator should obtain assistance of
a vascular surgeon.
Small bowel (25) Iliac artery (19) Colon
(12) Iliac or another retroperitoneal vein (9)
Secondary branches of a mesenteric vessel (7)
Aorta (6) Inferior vena cava (4) Abdominal
wall vessels (4) Bladder (3) Liver (2) Other
(lt2) Port-site metastasis refers to cancer
growth at a port
Withdrawal of InstrumentsandPorts Once the
surgery is finished, all the instrument should be
removed carefully under vision. All the
accessory port should be removed, and the gas is
removed by releasing the valve of 10 mm
cannulas. The primary port should be taken out in
the end (Fig. 53). If last port is suddenly
withdrawn sudden suction effect of cannula can
pull the omentum or bowel inside the port wound,
the chances of port-site hernia and adhesion are
much higher in this case. It is a good practice
to insert some blunt instrument or telescope
inside the abdomen while removing the last
cannula out over that instrument, to prevent
inadvertent entrapment of omentum or bowel
(Figs. 54A and B) .
incision site after laparoscopic tumor resection.
Port-site metastasis occurs after 12 of
laparoscopic procedures performed in the
presence of intraperitoneal malignancy, which is
equivalent to the rate of wound metastasis after
laparotomy performed under similar conditions.
Mechanism of metastasis includes hematogenous
spread or direct contamination by tumor cells,
secondary effects from pneumoperitoneum-related
immune suppression, and surgical technique.
Although it is not clear whether port- site
metastases can be prevented, suggested measures
to minimize the risk of port-site metastases
include the use o
Recommended
CrystalGraphics Presentations


