
PE.9 Hints - PowerPoint PPT Presentation
1 / 2
Title:
PE.9 Hints
Description:
Step 3: There is no need to do anything initially with the Hatch Patterns. ... Hatch Boundary layer so that you can easily. turn this layer off after creation. ... – PowerPoint PPT presentation
Number of Views:17
Avg rating:3.0/5.0
Title: PE.9 Hints
1
PE.9 Hints
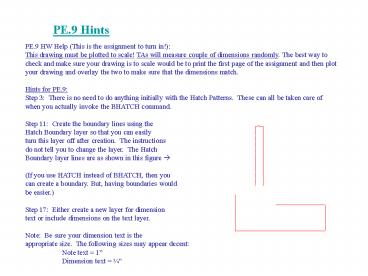
PE.9 HW Help (This is the assignment to turn
in!) This drawing must be plotted to scale! TAs
will measure couple of dimensions randomly. The
best way to check and make sure your drawing is
to scale would be to print the first page of the
assignment and then plot your drawing and overlay
the two to make sure that the dimensions
match. Hints for PE.9 Step 3 There is no need
to do anything initially with the Hatch Patterns.
These can all be taken care of when you actually
invoke the BHATCH command. Step 11 Create the
boundary lines using the Hatch Boundary layer so
that you can easily turn this layer off after
creation. The instructions do not tell you to
change the layer. The Hatch Boundary layer
lines are as shown in this figure ? (If you use
HATCH instead of BHATCH, then you can create a
boundary. But, having boundaries would be
easier.) Step 17 Either create a new layer for
dimensiontext or include dimensions on the text
layer. Note Be sure your dimension text is
theappropriate size. The following sizes may
appear decent Note text 1 Dimension text
¾
2
PE.9 HW Help This is what the PE9 drawing looks
like
Recommended
CrystalGraphics Presentations


