Start up PowerPoint PPT Presentation
1 / 3
Title: Start up
1
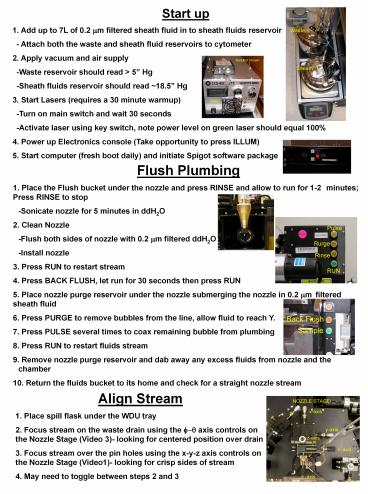
Start up 1. Add up to 7L of 0.2 mm filtered
sheath fluid in to sheath fluids reservoir -
Attach both the waste and sheath fluid reservoirs
to cytometer 2. Apply vacuum and air
supply -Waste reservoir should read gt 5
Hg -Sheath fluids reservoir should read 18.5
Hg 3. Start Lasers (requires a 30 minute
warmup) -Turn on main switch and wait 30
seconds -Activate laser using key switch, note
power level on green laser should equal 100 4.
Power up Electronics console (Take opportunity to
press ILLUM) 5. Start computer (fresh boot daily)
and initiate Spigot software package
Flush Plumbing 1. Place the Flush bucket under
the nozzle and press RINSE and allow to run for
1-2 minutes Press RINSE to stop -Sonicate
nozzle for 5 minutes in ddH2O 2. Clean
Nozzle -Flush both sides of nozzle with 0.2 mm
filtered ddH2O -Install nozzle 3. Press RUN to
restart stream 4. Press BACK FLUSH, let run for
30 seconds then press RUN 5. Place nozzle purge
reservoir under the nozzle submerging the nozzle
in 0.2 mm filtered sheath fluid 6. Press PURGE
to remove bubbles from the line, allow fluid to
reach Y. 7. Press PULSE several times to coax
remaining bubble from plumbing 8. Press RUN to
restart fluids stream 9. Remove nozzle purge
reservoir and dab away any excess fluids from
nozzle and the chamber 10. Return the fluids
bucket to its home and check for a straight
nozzle stream
Align Stream 1. Place spill flask under the WDU
tray 2. Focus stream on the waste drain using the
f-q axis controls on the Nozzle Stage (Video 3)-
looking for centered position over drain 3. Focus
stream over the pin holes using the x-y-z axis
controls on the Nozzle Stage (Video1)- looking
for crisp sides of stream 4. May need to toggle
between steps 2 and 3
2
Illuminate 1. Close Chamber sliding door, run
finger over light shutoff window 2. Open Green
laser SHUTTER 3. Steer laser to a position
between the 1st and 2nd pinhole on video screen 1
(blue laser _at_ 2.74mm position on micrometer, SSC
_at_ 1.23mm, FSC_at_ 2.71mm) 4. Fill sample tube (5mL
polypropylene culture tube) with 1 mL of sheath
fluid and 2-3 drops of alignment beads 5. Load
tube on the sampler and press SAMPLE and press
BOOST to sample more quickly (you will see beads
flowing in Video Window 1) 6. Steer laser into
1st pinhole 7. Open the spigot configuration file
(XXXXX.sco), take note of the FSC1 vs SSC plot.
Use the FSC and the green laser axis controls to
further optimize the bead alignment using the
graphical representation as a reference. 8.
Repeat process for UV (2.89mm) and Red laser
(2.97mm)
Sample Sort 1. In the Sort Menu chose the FCS1 vs
SSC graphical representation of the sample. In
middle left of the screen, chose to gate the left
window and select DRAW WINDOW. 2. Using the right
button on your mouse generate a polygonal figure
around the beads. The figure will highlight in a
translucent green. You will need this later. 3.
Using a clean chem wipe wash off the interior
portion of the deflection plates, reattached the
plates, Press PLATES
3
Droplet Formation 1. Turn on Piezo Drive (In sort
config menu). Start with Piezo Amplitude of .35
and a drop frequency of 49.7. 2. Set Deflection
Charge Amplitude to 70 V and a stream focus of
7. Press LEFT and RIGHT TEST DEFLECT. Adjust
the DCA such that the highlight sort bead barely
nicks the white blocks to the right and the
left. 3. Find Break off point on second monitor
(Video 2)- set such that break off occurs at a
drop position of 210-215 . This will require
first a toggle of the drop frequency and a fine
adjustment of the Piezo amplitude. 4. Set values
into Delay Calculator values starting with break
off point, up to the nozzle and finishing with
the 10 drop count. Press CALCULATE. 5. In the
Sort Tray Menu, Press PRESENT TRAY. Place a
clean microscope slide on the tray. Press SORT
READY. 6. In the Sorted Sample Container menu
chose Calibration slide. 7. Just above the SSC
menu chose the LEFT sort window and press SORT.
A slide will be generated with 25 drops. Under
fluorescence microscopy find the drop containing
20 beads (give or take 2). 8. Set the delay to
reflect this value.
Shut Down 1. Run 10 Bleach through sample line
for 5 minutes run nanopure ddH2O for 5
minutes 2. Press BACK FLUSH allow to run for 1
min 2. Press RUN to close off the fluidics 3.
Turn AIR control to OFF 4. Empty Sheath Fluids
Reservoir and wash the interior with Nanopure
deionized water and dispose of this volume 5. Add
1L of Nanopure de-ionized water to the reservoir
and reattach Turn AIR on 6. Press RINSE and
BACKFLUSH and let the clean water flow through
the system until both the sheath line and the
sample line run dry 7. Press RUN and remove the
nozzle tip place nozzle assembly in ddH2O for
overnight storage. 8. Press RINSE and BACKFLUSH
allow the system to blow air for 10-15 minutes
Turn AIR off 9. Remove Sheath and Waste
reservoirs emptying out the remaining fluids air
dry the reservoirs on the back shelves nearest
the HOOD. 10. Shut down the remaining controls
LASERs, Electronics Panel, Computer. 11. Clean
off the Sort Chamber Area.

