
Step 1 PowerPoint PPT Presentation
1 / 1
Title: Step 1
1
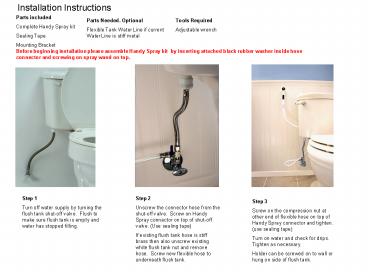
Installation Instructions
Parts included Complete Handy Spray kit Sealing
Tape Mounting Bracket
Tools Required Adjustable wrench
Parts Needed. Optional Flexible Tank Water Line
if current Water Line is stiff metal
Before beginning installation please assemble
Handy Spray kit by inserting attached black
rubber washer inside hose connector and screwing
on spray wand on top.
Step 1 Turn off water supply by turning the flush
tank shut-off valve. Flush to make sure flush
tank is empty and water has stopped filling.
Step 2 Unscrew the connector hose from the
shut-off valve. Screw on Handy Spray connector
on top of shut-off valve. (Use sealing tape) If
existing flush tank hose is stiff brass then also
unscrew existing white flush tank nut and remove
hose. Screw new flexible hose to underneath
flush tank.
Step 3 Screw on the compression nut at other end
of flexible hose on top of Handy Spray connector
and tighten. (use sealing tape) Turn on water and
check for drips. Tighten as necessary. Holder can
be screwed on to wall or hung on side of flush
tank.
Recommended
