
Setting Up Email in Outlook - PowerPoint PPT Presentation
1 / 41
Title:
Setting Up Email in Outlook
Description:
Setting Up Email in Outlook. From the Tools menu, select E-mail Accounts ... Within the main screen of the Outlook Explorer, on the left hand side it has all ... – PowerPoint PPT presentation
Number of Views:402
Avg rating:3.0/5.0
Title: Setting Up Email in Outlook
1
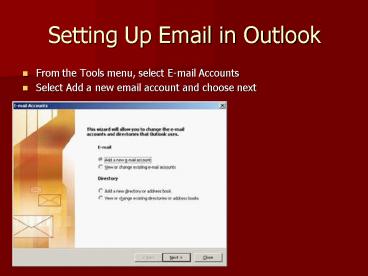
Setting Up Email in Outlook
- From the Tools menu, select E-mail Accounts
- Select Add a new email account and choose next
2
- Select IMAP as the type of account you are
creating, and then select next
3
- In your name box, enter your name exactly as you
would like it to appear to recipients. - In the E-mail Address box, type your WSC email
address. - In the User Name box, type your account name
(electronic ID, your email address without the
_at_wsc.nodak.edu included) - In the password box, type your email password.
- In the incoming mail server, type
imap.ndsu.nodak.edu - In the outgoing mail server, type
smtp.ndsu.nodak.edu - Then select More Settings
4
- Select the Advanced Tab, Under the Incoming Mail,
make sure there is a check mark next to This
server requires an encrypted connection. The
port number should be 993. - Under the Outgoing Mail, also select a box saying
This server requires an encrypted connection.
The port number for this server should be 587.
5
- Select the Outgoing Server Tab
- Check the box next to My outgoing server
requires authentication. Then choose Use same
settings as my incoming mail server. - Click Ok
6
- Select Next
- Then you will get to this screen, and press
Finish.
7
Calendar Making an Appointment
- There is two ways to make an appointment. First
start by clicking on the calendar tab in the left
corner. From here to make an appointment you can
double click on the time you want, or you can go
to actions and New Appointment.
8
Making an Appointment
- From there you will see this screen.
- From here you can type in your subject,
location, and the time you want the appointment
to start and end, or if its an all day event.
You are also able to set an alarm for the
appointment time by clicking the reminder button
and setting how long before the appointment you
want the alarm to go off. You are also able to
type in a message.
9
Adding Contacts to an Appointment
- If you want to email this meeting or appointment
to other people, you are able to enter in the
contacts you want the appointments sent to in a
few different ways. One way is to press the
Invite Attendees button, and then a To line
will pop up. Also by pressing the To button
your contact list will appear and you can select
people from there by double clicking on their
names.
10
Adding Contacts Contd
- The second way you are able to add contacts is by
clicking on the Scheduling tab. From here on the
very left hand side you will see a row that says
All Attendees. There it will show you who is
currently invited, or who the appointment has
already been selected to be emailed to. If you
would like to further add people to this list, in
the bottom left corner you can click on the Add
Others button. From there you can select from
your contact list just like you did in the
previous way.
11
Recurrence
- If you have an appointment that is going to be
happening more than once instead of redoing the
appointment all over again, you can use the
Recurrence button. By selecting the Recurrence
you are able to put in when the appointment will
happen again, what day/days, if it would be
daily, weekly, monthly or yearly, the duration,
and even how many occurrences there will be.
Remember
Make a note of all Appointments times between
March 11 and April 1. The times may not
stick Due to Daylight Saving Time changes.
12
Meetings and Appointments
- If you would like to invite attendees to a
meeting you can also use the appointment
scheduler.
13
Distribution Lists
- Distribution lists are nice to use when you send
emails to a certain group of people often. This
way instead of always finding their addresses and
putting them in, you can just select the
distribution list with those contacts already in
it.
14
Creating a Distribution List
- To create a distribution list go to File, New,
and then select Distribution List. - From there you click on the Select Members
button. Then your whole contact list will pop up
and you double click on the names you want added
to this list. - If an address you want in the distribution list
is not in your contact list you can instead
select the Add New button. From there it will
ask for your desired display name for the contact
and their email address. - After you are done adding everyone you want in
the list, you can Name your list by typing it in
the Name line. If you would like to add any
notes to the list just select the Notes tab.
After your all done, just press the Save and
Close button in the top left corner and your
list will be created.
15
Using your Distribution List
- When you use your distribution list in an email,
it is very similar as adding a contact. - Just the same as adding a contact, you click To
to get your contact list to pop up. Instead of
double clicking on a single contact your
distribution list will also be available as an
option. So just the same as double clicking on a
single contact, double click on the desired
distribution list. - Then just click ok and your list will be in your
To line. - All distribution lists will always be in bold
lettering
16
Tasks
- Tasks are set up very similar to the way you set
up an appointment. You first start by selecting
the task tab on the lower left hand side in the
main Outlook screen. You will then be taken to
this screen. From there you can either click
New or double click on an empty line in the
task screen. In this screen you can also select
different ways to view the current or overdue
tasks.
17
Creating a New Task
- When you get into the New task screen, it will
look very similar to the New appointment screen.
Within this screen you are able to put in the
Subject of the specific task, enter in when the
task deadline, and when the task was started.
You can also keep track of the status of the
task, such as in progress or deferred and set a
level of priority to it. This screen you are
also able to select the reminder tab to have an
alarm go off for whenever you desire. - You are also able to assign tasks to others, very
similar to how you were able to invite attendees
to appointments. You simply click on the Assign
task button in the toolbar and a To line will
appear, where you can either select contacts or
enter in email addresses of whom you would like
the task to be assigned to, and it will then be
sent to the person.
18
Tasks Contd
- You will also notice there is another tab that
says Details. In this screen you are able to
enter in more specific information. It allows
you to enter in the date completed, total work
and actual work (in hours), mileage, billing
information, and company, if needed. - You can also use the Recurrence button for tasks.
It works exactly the same as it did with
appointments and the button is located in the
same place. - When you have completed putting in all the
information you can click Save and Close and
you will be taken be to the main task screen.
19
Favorites Folders
- Within the main screen of the Outlook Explorer,
on the left hand side it has all your mail for
your Inboxs, Sent Items, Drafts, Trash, and etc.
Above all of those, there is a Favorites Folder.
Because you have more than one Inbox and other
folders, it allows you to drag the one you feel
you use the most into the Favorites. All you
have to do is click and drag the desired folder
and bring it up into the favorites area. Also if
you do not want to drag and drop, you can right
click a folder and select Add to Favorites
Folders. Then from now on that folder will also
be displayed in the favorites area. If there is
a folder in the favorites area you would like to
remove, right click on the desired folder and
select Remove from Favorites Folders.
20
Contacts
- First, to get to the contacts screen you select
the Contacts tab in the bottom left hand corner.
From there your contacts should appear. You are
able to arrange or view your contacts in a few
different ways. Under Current View you can
select the way you would like your contact list
to appear to you.
21
Adding a New Contact
- Adding a new contact is relatively simple. In
the toolbar, click on the New button. From
there the contact screen will appear. You will
see you can enter a lot of information about the
contact. The first tab, which is General
allows you to enter in their name, job title,
company, email address, phone number, etc.
22
Details Tab
- The next tab is Details. This tab allows you
to enter in more detailed information about the
person such as their office, boss, profession,
birthday, spouses name, anniversary, etc.
23
Signatures
- Outlook allows you to add a Signature to your
emails. By creating a signature, it will appear
on the end of all emails automatically so you do
not have to type it every time. You can have it
be just your name, or your name, address, and
telephone number, or anything you wish.
24
Adding a Signature
- In order to add a new signature you start by
selecting Tools and then Options. You then go
over to the Mail Format tab. From there, at the
very bottom there is a section that says
signatures. You are able to create signatures by
clicking on the signatures button. From there
select new and create a name for that specific
signature. You are then able to type in how you
would like your signature to appear, and you can
finish by clicking OK. Outlook allows you to
create more than one signature to use, so you are
also able to assign specific signatures to new
messages and if you would like, a different
signature to replies and forwards.
25
What the screens will look like
26
Junk Mail
- Microsofts Outlook also allows you to decide
which emails you would like to come to your
Inbox, and which you would like to go directly to
Junk Mail. It allows you to choose different
filtering levels, who you want put on the safe
list (whos emails you want to come directly to
the Inbox) and who specifically you want blocked.
To get to these settings, you start by going to
Tools and selecting Options. Then when that
screen appears, you click on the Junk Email
button.
27
Junk Mail Contd
- From there you will be taken to the Options tab.
In this tab it allows you to change the level of
junk email protection you want. Once you have
selected the setting you would like, the next tab
shown is Safe Senders. This tab allows you to
add people who you email to this list, so if they
ever reply back their messages will not be sent
to Junk Mail. There is also a button on this
screen that allows your email to recognize your
whole contact list as safe senders so their mail
will never be sent to junk mail.
28
Safe Recipients
- Safe Recipients is pretty much the same thing as
Safe Senders, except it is for people who email
you. If you get regular emails from people and
you do not want their emails going into the Junk
Box, simply add their email address to the safe
recipients list and their mail will always go
into your inbox.
29
Blocked Senders
- The next tab is Blocked Senders. This tab allows
you to put in the email addresses for the mail
you always want to go into the junk mail folder.
So for any type of mail you do not want to see
just add the address to the blocked senders tab.
30
Spelling
- Microsoft Outlook also has a spelling and grammar
check that can be used on emails, appointments,
tasks, etc. On each different selection the
spelling tool can be found in the same place.
After you are finished typing your new email, or
appointment you go up and select Tools and then
Spelling. From there it will tell you misspelled
words, fragment sentences and more.
31
Spelling Contd
- Also, if you would like Outlook to check your
spelling automatically on all documents before
they are sent out, you can set it to do so. You
do this by going to Tools, and then Options.
From there go over and select the Spelling tab.
From there you can customize your spellchecker by
clicking on the box of the option you would like
selected. For example, if you would like the
spell checker to check your spelling on all
documents automatically, you would select the
option Always check spelling before sending.
32
What the screen will look like
33
Making a New Folder
- Outlook also allows you to make new folders. In
order to do this, just right click on an existing
folder and select New Folder. From there pops
up another screen. First you can enter in what
youd like to name the folder and then below that
you can choose what the folder will contain.
Below that is where you can select where you want
the folder placed. You can either place it your
personal folder area or the IMAP folder area.
34
What the screen will look like
35
Moving Messages to New Folders
- In Outlook you can also move your emails to any
folder you would like. Within your IMAP folders
you have a quota for how many emails you are
allowed to have in there. If those folders start
getting full, any messages that you would like to
keep you can drag into any folder under the
Personal Folders. You do this by clicking on the
email you wish to move, and dragging it into your
desired folder. The folder will become
highlighted when it is selected.
36
What the screen will look like
37
Checking Quota
- In case you are not sure what your allowed quota
is for your IMAP folders and you are not sure if
your close to getting full, there is a way you
can check it. Using Explorer you go to
enroll.nodak.edu. When that screen comes up you
enter in your electronic ID and your password.
It will then take you to another screen. On the
right hand screen there is an option to click
that says Check Email Quota. Click on that and
it will tell you how many megabytes you are using
and how many you have available yet to use.
38
What the screen will look like after you log in
39
What the screen will look like when you select
Check Email Quota
40
Send/Receive Timings
- Outlook allows you to customize the settings of
how often you want emails to be sent and
received. In order to do this you go to Tools,
then Options and select the Mail Setup tab. From
there click on the Send/Receive button. In that
window it allows you to adjust the send/receive
time from as low as 1 minute. It also allows you
to select the option perform an automatic
send/receive when you are exiting.
41
What the screen will look like
Recommended
CrystalGraphics Presentations


