This project is supported, in part, by - PowerPoint PPT Presentation
Title:
This project is supported, in part, by
Description:
This project is supported, in part, by. the US National Science Foundation (LCDRD award) ... Goals: Provide a framework on which one can interchange modules ... – PowerPoint PPT presentation
Number of Views:11
Avg rating:3.0/5.0
Title: This project is supported, in part, by
1
Endplate for the LCTPC Large Prototype Endplate
D. Peterson, Cornell University
This project is supported, in part, by the US
National Science Foundation (LCDRD award). This
project is in collaboration with LC-TPC.
2
The endplate is part of a
collaborative effort to evaluate
several readout technologies for a TPC being
developed as the main tracking
device of an ILC detector
Micromegas, GEM, pixel. Goals Provide a
framework on which one can interchange modules
using the various technologies with
minimal disruption to the other
parts of the experiment, in particular the field
cage. Provide experimenters
with mechanical components that
allow implementation of different modules in the
endplate. For reconstruction
development, provide a geometry
that resembles the radial geometry of the final
detector. For calibration
development, provide a precision frame
which will allow investigation of techniques
of the calibration of the magnetic
field uniformity. Investigate a
particular design idea an idea
that could evolve into a low radiating material
design.
3
Time line 2005-11 Vienna expression of
interest of groups to build the large prototype
2006-01 Cornell raising the interest within
Cornell 2006-04 Berkeley initial ideas for
the panel geometry 2006-07 Vancouver the
mullions frame takes shape 2006-11 Valencia
endplate stiffness, details of
holding panels start of the
stress relief tests 2007-06 DESY The module
backframe size is defined, the
stress relief process is defined. 2007-10
Fermilab Final fieldcage/ geometry is defined.
Proceed with initial backframes
for modules Start vendor
search. 2008-02 Ithaca ship initial
backframes, made at Cornell 2008-05 Ithaca
vendor cuts metal on endplate 2008-06
Ithaca initial deliver of completed endplates
2008-08 Ithaca precision correction complete,
delivered to DESY 2008-10
DESY endplate mounted on fieldcage.
4
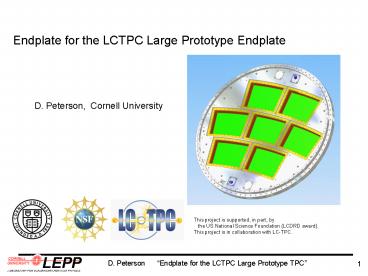
There are provisions for 7 identical detector
modules.
The Large Prototype endplate is designed as
a section of a proposed TPC for the ILC.
This facilitates the goal of investigation of
track reconstruction in that detector. (Although
all modules have identical geometry layers have
common radius of curvature.
5
The endplate design has readout modules mounted
and sealed on thin structural frame members
the basic structural element between modules is
the mullions .
module backframe, provided with the endplate.
o-ring seal
mounting bracket, locates the module and
compresses the o-ring, provided with the
endplate
gas amplification and charge collection
6
Modules are located by dowel pins that fit into
precision holes in the outside surface of the
plate. The framework locates the holes and
provides the sealing surface for the modules.
This frame must be not deflect with the small
over-pressure of the chamber gas (2mBar),
locate the holes with 25µm accuracy, and be
stable over time. Simply machining the
structure will not provide this.
Inside
Outside
dowel pin hole
7
Manufacturing processes were evaluated with a
series of identical test plates having
mullions similar to those in the endplate.
Test plates were measured at each step in a
Coordinate Measuring Machine. Tested vibration
treatment, heat treatment, and cold-shock
(liquid nitrogen). Selected process with the
most success providing the dimensional
tolerance machine leaving a 0.75mm skin, cold
shock in liquid nitrogen, machine leaving a
0.25mm skin, cold shock in liquid nitrogen,
machine to final dimensions.
8
The gas seal is provided by an o-ring.
Long-term tests of the o-ring configuration
showed no pressure change in over 1 year.
A tested plate was measured under load in the
Coordinate Measuring Machine with the result
that the deflection will be 7µm with
2.6milliBar chamber over pressure.
9
Endplates were produced wit the 3-step
machining process. Measurements of the
dowel pins holes positions showed a typical
tolerance of 15µm with a few excursions to
30µm. Some of the side surfaces varied from
the design positions by as much as 150 µm.
In these cases, the surfaces were re-machined to
correct the error. There was no warping of the
mullions when this material was removed.
10
A series of module backframes were produced for
various planned experiments (varying only in
length) Micromegas (8) double-GEM with
gate (8) triple-GEM without gate (1) GEM
with pixel readout (2) dummy modules (14).
These were produced with the 3-step machining
process. About half of the module backframe
required a 4th machining step to bring them into
25µm tolerance.
11
The finished product
Outside the chamber
Inside the chamber
Field cage termination
Laser input
alignment light input
mounted module backframe
mounting bracket
12
30-October-2008, Endplate, fully assembled,
with Micromegas module in center location.
30-October-2008 The leak test, on the field
cage With 42 o-rings, and 8 pipe threads, the
leak test passed, requiring much more that my
prediction.


